I love May Day. It means summer is right around the corner (even if I woke this morning to snow on the ground). I have a darling neighbor who always doorbell dings us and leaves a little mayday surprise on our doorstep. I have always dreamed of having a maypole in my yard...and then I came across this Maypole Cake from Martha Stewart and I thought it was the most adorable thing I had seen!! I could totally do a maypole cake--much less daunting than a real Maypole set up in my yard. (For the complete recipe click on the link to her site.) However you spend your May Day...happy spring from us at Holiday Snob!
The two sisters at Ladybird Ln made these two lovely Mother's Day printables (which I will be ordering when I get going someday...)
And then my super fabulous friend Leslie sent me an email with a link and image from Little Birdie Secrets: It's a greeting card from Tiny Prints!
Linking here:

Dot and Glitta
But we wanted frame-able art. (What is it about all us DIYers? We think if we can't have something JUST the way we want it, we'll do it ourselves!!!) So snobs, here's a free printable from us. Just let us know in a comment if you use it, and we'd love it if you added yourself as a follower! Thanks!
 |
| 5x7 jpg |
 |
| 8x10 or 16x20 jpg |
 |
| 11x14 |
 |
| 16x20 |

Dot and Glitta
Linking here:
Sunday:
Monday:
http://craftomaniac.blogspot.com/, http://makingtheworldcuter.blogspot.com/, http://diyhshp.blogspot.com/, http://www.skiptomylou.org/, http://sumossweetstuff.blogspot.com/, http://marvelouslymessy.blogspot.com
Tuesday:
http://todayscreativeblog.net/, http://ladybug-blessings.com/, http://tipjunkie.com/, http://www.sugarbeecrafts.com/, http://blackberryvine.blogspot.com
Wednesday:
http://eisymorgan.blogspot.com/, http://www.paisleypassions.blogspot.com/, http://somedaycrafts.blogspot.com/, http://www.bluecricketdesign.net/, http://www.mybackyardeden.com/, http://reasonstoskipthehousework.blogspot.com
Thursday:
http://www.momnivores-dilemma.com/, http://www.houseofhepworths.com/, http://nightowlcrafting.blogspot.com/
Friday:
http://www.whipperberry.com/, http://www.kojodesigns.blogspot.com/, http://www.thegirlcreative.com/,http://tidymom.net/, http://sassysites.blogspot.com/, http://shabbynest.blogspot.com/, http://tatertotsandjello.blogspot.com/, http://www.findingfabulousblog.com/
Saturday:
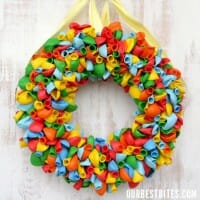
So next week is National Teacher Appreciation Week and we definitely have some teachers that we love. So Dot and I decided we needed a little something snazzy to show our love. We have been in love with the balloon wreaths we have seen "floating" around....
a couple of our favs:
So with those little beauties as our inspiration we created the teacher appreciation balloon wreath. We thought it was fitting because...well we are in love with them...and balloons are eternally connected to kids, and they are bright and fun and don't you think it will look adorable on your favorite teacher's desk - maybe hung on a wreath stand or hanging on their wall? And most importantly it fit perfectly with our cheesy little saying "voted most POPular!"
How cute would it be to give those teachers the subway art and the wreath and bring them in lunch? I am thinking they will really be feeling the love?... Whatever your ambition level is this next week we hope we have given some inspiration and would love to hear your ideas!

a couple of our favs:
 |
| Landee See Landee Do |
 |
| Our Best Bites |
So with those little beauties as our inspiration we created the teacher appreciation balloon wreath. We thought it was fitting because...well we are in love with them...and balloons are eternally connected to kids, and they are bright and fun and don't you think it will look adorable on your favorite teacher's desk - maybe hung on a wreath stand or hanging on their wall? And most importantly it fit perfectly with our cheesy little saying "voted most POPular!"
Teacher Appreciation Balloon Wreath
A+ Teacher Take Out
 |
| Our next little treat for teach is a fancied up sonic drink carrier. We just used a little spray glue (love) and placed 2 napkins to cover the carrier. Then we made the little tag with scrapbook paper and of course we used our standby crepe paper for a rosette. Then we are going to fill it with lunch for our favorite teachers. But it could also be used as a cute holder for any fun little gifts you want to shower your teacher with. Good luck with appreciating those teachers!! What would we do without them. This little treasure can be found and downloaded free at eighteen 25. Those girls really do rule the school don't they!! |
 |

One of our favorite holiday traditions? After sales! Besides the cute decor, there's a few basics you should grab for next year's crafts:
Stock up on some cheap plastic eggs so you can makes some permanent versions of Originate and Renovate's lovely place cards:
 |
| Originate and Renovate |
Mrs. Meyer's Musings has another reason to go get some cheap eggs:
 |
| Mrs. Meyer's Musings |
 |
 |
| Tip Junkie |
 |
| Little Birdie Baby |
Or be on the lookout for little wreaths or eggs so you can make Pudel's nest specimen art:
 |
| Pudel Design |
Or Scissors and Spatula's napkin rings:
 |
| Scissors and Spatulas |
 |
And not that Peeps aren't all ready cheap at full price, but it's even better when they're on sale and they don't need to be fresh for a craft project!
 |
| Sweet Little Smoothie |
 |
| The Autocrat |
 |
| Mommy Savers |
So go have fun shopping!
Dot and Glitta
Linking here:
Sunday:
Monday:
http://craftomaniac.blogspot.com/, http://makingtheworldcuter.blogspot.com/, http://diyhshp.blogspot.com/, http://www.skiptomylou.org/, http://sumossweetstuff.blogspot.com/
Tuesday:
http://todayscreativeblog.net/, http://ladybug-blessings.com/, http://tipjunkie.com/, http://www.sugarbeecrafts.com/
Wednesday:
http://eisymorgan.blogspot.com/, http://www.paisleypassions.blogspot.com/, http://somedaycrafts.blogspot.com/, http://www.bluecricketdesign.net/, http://www.mybackyardeden.com/, http://reasonstoskipthehousework.blogspot.com
Thursday:
http://www.momnivores-dilemma.com/, http://www.houseofhepworths.com/, http://nightowlcrafting.blogspot.com/
Friday:
http://www.whipperberry.com/, http://www.kojodesigns.blogspot.com/, http://www.thegirlcreative.com/,http://tidymom.net/, http://sassysites.blogspot.com/, http://shabbynest.blogspot.com/, http://tatertotsandjello.blogspot.com/, http://www.findingfabulousblog.com/
Saturday:
I wish I could tell you that these yummy cupcakes were what I made for dessert for Easter, but Costco was out of raspberries and I was out of time for errands after Costco! So I made an meh dessert tonight instead. Blech. I hate a lot of work for meh.
Moving on... I made these for a birthday party and they were a hit! I've been craving more since they disappeared so quickly, so they most likely will be Mother's Day dessert! Anyway, they're super easy and you should try 'em!
White Chocolate Raspberry Cupcakes
1 box of white cake mix, eggs and oil according to package
1 small cartons of raspberries, rinsed and drained
1 c. (approximately) of white chocolate chips, melted
(yep, that's the ingredients)
I followed the package directions, then added about a cup of melted white chocolate, mixing quickly as it was added. Then I dumped in a small carton of raspberries and mixed those bad boys in. This made 6 dozen mini cupcakes, which was about 2 more than a cake mix usually makes for me. Cook according to directions.
White Chocolate Frosting
1 8 oz package of cream cheese
1 stick of butter
(1/4 c to 1/2 c) whole milk
2 lbs of powdered sugar
1 c. of melted white chocolate
dash of salt
1 small carton of raspberry
Blend together softened cream cheese and butter, then add powdered sugar and milk in increments to make sure the consistency is right. Then add melted white chocolate. If it's too thick, thin with a tiny amount of milk. Add a dash of salt and blend. Top with a fresh raspberry!
Dot and Glitta
Linking here:
Sunday:
Monday:
http://craftomaniac.blogspot.com/, http://makingtheworldcuter.blogspot.com/, http://diyhshp.blogspot.com/, http://www.skiptomylou.org/, http://sumossweetstuff.blogspot.com/, http://marvelouslymessy.blogspot.com
Tuesday:
http://todayscreativeblog.net/, http://ladybug-blessings.com/, http://tipjunkie.com/, http://www.sugarbeecrafts.com/, http://blackberryvine.blogspot.com
Wednesday:
http://eisymorgan.blogspot.com/, http://www.paisleypassions.blogspot.com/, http://somedaycrafts.blogspot.com/, http://www.bluecricketdesign.net/, http://www.mybackyardeden.com/, http://reasonstoskipthehousework.blogspot.com
Thursday:
http://www.momnivores-dilemma.com/, http://www.houseofhepworths.com/, http://nightowlcrafting.blogspot.com/
Friday:
http://www.whipperberry.com/, http://www.kojodesigns.blogspot.com/, http://www.thegirlcreative.com/,http://tidymom.net/, http://sassysites.blogspot.com/, http://shabbynest.blogspot.com/, http://tatertotsandjello.blogspot.com/, http://www.findingfabulousblog.com/, http://www.littlebrickranch.com/
Saturday:
I have to say sometimes I see a craft and I just want to reach out and touch it is so dang cute. That is how I felt when I saw this tutorial for these stenciled eggs. I mean I want to pet them. I also am now going to make my 8 year old daughter get her little buns into a tutu and put on bunny ears for a silhouette pic--that may mean I am bribing her with a trip to Justice later but it will so be worth it. Maybe I should just make my little 4 year old guy put on the tutu...no one would know...right!! (okay don't tell my hubs that I might be considering that..wink wink) But seriously!! PRECIOUS. For her full tutorial, head over to her blog!
Did you love it? I am dying to know or if I am just a little bunny crazy these days....let us know what you thought.
Here's some we ended up making with our own pictures. I cut out pictures of my kids and then traced it onto chocolate colored vinyl. The eggs I used were BIG, about 8 inches tall from a store called Tai Pan. I just stuck the vinyl on, but ended up modge-podging it as well since it didn't stick to the surface very thoroughly. Then I cut out a bunny, chick and easter basket with my Cricut and applied them as well. Sorry for the dark pictures, but these eggs are going into some baskets tomorrow so the only chance I've had to photograph them was once the kiddos were asleep!

Linking here:
Sunday:
http://iheartnaptime.blogspot.com/
Friday:
http://www.whipperberry.com/, http://www.kojodesigns.blogspot.com/, http://www.thegirlcreative.com/,http://tidymom.net/, http://sassysites.blogspot.com/, http://shabbynest.blogspot.com/, http://tatertotsandjello.blogspot.com/, http://www.findingfabulousblog.com/
Saturday:
http://www.bedifferentactnormal.com
Silhouette Easter Eggs Craft Tutorial from Vana of Le Papier Studio. Enjoy!
***
Did you love it? I am dying to know or if I am just a little bunny crazy these days....let us know what you thought.
Here's some we ended up making with our own pictures. I cut out pictures of my kids and then traced it onto chocolate colored vinyl. The eggs I used were BIG, about 8 inches tall from a store called Tai Pan. I just stuck the vinyl on, but ended up modge-podging it as well since it didn't stick to the surface very thoroughly. Then I cut out a bunny, chick and easter basket with my Cricut and applied them as well. Sorry for the dark pictures, but these eggs are going into some baskets tomorrow so the only chance I've had to photograph them was once the kiddos were asleep!

Linking here:
Sunday:
http://iheartnaptime.blogspot.com/
Friday:
http://www.whipperberry.com/, http://www.kojodesigns.blogspot.com/, http://www.thegirlcreative.com/,http://tidymom.net/, http://sassysites.blogspot.com/, http://shabbynest.blogspot.com/, http://tatertotsandjello.blogspot.com/, http://www.findingfabulousblog.com/
Saturday:
http://www.bedifferentactnormal.com
Now I have to admit when you find a patent shoe in a perfectly delish yellow a "redo" is not really necessary!! (Did I mention these shoes are from Macy's and on sale for less than $30...just got them) But, due to my snobbish nature and the fact that I keep seeing all of your snobbish clothing remakes out their in the blog world I had to do it!! So with Easter coming up I knew these babies had to have topper.

Linking here:

Sunday:
http://iheartnaptime.blogspot.com/
Monday:
http://craftomaniac.blogspot.com/, http://makingtheworldcuter.blogspot.com/, http://diyhshp.blogspot.com/, http://www.skiptomylou.org/, http://sumossweetstuff.blogspot.com/
Tuesday:
http://todayscreativeblog.net/, http://ladybug-blessings.com/, http://tipjunkie.com/, http://www.sugarbeecrafts.com/
Wednesday:
http://eisymorgan.blogspot.com/, http://www.paisleypassions.blogspot.com/, http://somedaycrafts.blogspot.com/, http://www.bluecricketdesign.net/, http://www.mybackyardeden.com/, http://reasonstoskipthehousework.blogspot.com
Thursday:
http://www.momnivores-dilemma.com/, http://www.houseofhepworths.com/, http://nightowlcrafting.blogspot.com/
Friday:
http://www.whipperberry.com/, http://www.kojodesigns.blogspot.com/, http://www.thegirlcreative.com/,http://tidymom.net/, http://sassysites.blogspot.com/, http://shabbynest.blogspot.com/, http://tatertotsandjello.blogspot.com/, http://www.findingfabulousblog.com/
Saturday:
http://www.bedifferentactnormal.com
 |
| Like I said they really are delish on their own aren't they? |
 |
| So the only question left: With or without the rosette? |

Linking here:

Sunday:
http://iheartnaptime.blogspot.com/
Monday:
http://craftomaniac.blogspot.com/, http://makingtheworldcuter.blogspot.com/, http://diyhshp.blogspot.com/, http://www.skiptomylou.org/, http://sumossweetstuff.blogspot.com/
Tuesday:
http://todayscreativeblog.net/, http://ladybug-blessings.com/, http://tipjunkie.com/, http://www.sugarbeecrafts.com/
Wednesday:
http://eisymorgan.blogspot.com/, http://www.paisleypassions.blogspot.com/, http://somedaycrafts.blogspot.com/, http://www.bluecricketdesign.net/, http://www.mybackyardeden.com/, http://reasonstoskipthehousework.blogspot.com
Thursday:
http://www.momnivores-dilemma.com/, http://www.houseofhepworths.com/, http://nightowlcrafting.blogspot.com/
Friday:
http://www.whipperberry.com/, http://www.kojodesigns.blogspot.com/, http://www.thegirlcreative.com/,http://tidymom.net/, http://sassysites.blogspot.com/, http://shabbynest.blogspot.com/, http://tatertotsandjello.blogspot.com/, http://www.findingfabulousblog.com/
Saturday:
http://www.bedifferentactnormal.com
Amy at Positively Splendid made this beyond cute little Easter Egg tee:
With a fantastic tutorial! Honestly, I would never have attempted to make this without having seen her step by step. You really should check it out! But mine is a little different, so we made a tutorial too!
1. Using that little doodle-pro egg, I traced an egg shape onto a piece of gray felt; then traced a piece of that pink striped fabric, just in case the ruffles didn't cover everything! I sewed the two pieces of fabric together first.

2. I went through my piles of ribbon and embellishments and just grabbed anything that seemed to work with an "Easter" theme.

3. I ruffled a few strips of ribbon. This is different from Amy's project because she used fabric she needed to semi-serge the edges. I figured if I used ribbon I wouldn't have to worry about fraying, plus I have much more of a selection in ribbon than fabric.
3. First I layered what I had until it looked right. But I'm lazy so I didn't pin.
4. Then I started hot-glueing each layer on, which also differs from Amy's tutorial, since she sewed each layer of ruffles. Lazy me again.
This is a picture of all the layers glued on, but not trimmed.
5. I then flipped the egg over to the back and sewed an edge around the now embellished egg. Then I trimmed anything past that edge.
6. Then I glued two jewelry pins onto the back, since I love the dress we're using for the party and I didn't want it to be just for Easter after this!
Finito!
This project was done with both kids awake and running around, asking for stuff, and it still only took me about 30 minutes. Let us know if you make one!
Dot and Glitta
Linking here:
Thursday:
http://www.momnivores-dilemma.com/, http://www.houseofhepworths.com/, http://nightowlcrafting.blogspot.com/
Friday:
http://www.whipperberry.com/, http://www.kojodesigns.blogspot.com/, http://www.thegirlcreative.com/,http://tidymom.net/, http://sassysites.blogspot.com/, http://shabbynest.blogspot.com/, http://tatertotsandjello.blogspot.com/, http://www.findingfabulousblog.com/
Saturday:


